How do I know if my CCTV is on or off at night? Easy Checks
Wondering about your surveillance after sunset is a common concern. A functioning cctv system provides essential peace of mind when darkness falls. This guide offers straightforward methods to verify your security coverage.
In Singapore, reliable nighttime monitoring is crucial for both homes and businesses. Your property deserves protection around the clock. Ensuring your system works properly after dark is non-negotiable.
Verifying active cameras involves more than spotting a power light. It requires visual confirmation, digital checks, and understanding device indicators. We’ll cover everything from led indicators to assessing video quality.
This article provides a clear, step-by-step approach. You’ll learn practical techniques to diagnose your system’s status. We bridge the gap between technical worry and confident action. The question “How do I know if my CCTV is on or off at night?” will be answered completely.
Follow our comprehensive checklist for reliable results. Gain the confidence that comes from understanding cctv operation. Implement regular checks to maintain optimal performance. Let’s begin the process to check cctv functionality and truly know cctv status.
Key Takeaways
- Nighttime CCTV verification is essential for complete security coverage.
- Proper checks go beyond simple power lights to include multiple confirmation methods.
- Visual inspection and digital monitoring are both necessary for accurate assessment.
- Understanding your specific system’s indicators is crucial for correct interpretation.
- Regular verification routines prevent security gaps during critical hours.
- A systematic approach eliminates guesswork about camera functionality.
- This guide provides actionable steps for homeowners and business operators.
Why Nighttime CCTV Monitoring is Critical for Security
Nightfall transforms the security landscape, creating unique challenges for property protection. Reduced visibility gives potential intruders a natural advantage. Your surveillance system must perform flawlessly during these critical hours.
Statistical data consistently shows increased criminal activity after dark. Burglaries, vandalism, and trespassing often peak during nighttime hours. Without proper monitoring, these incidents can go completely unnoticed.
In Singapore’s urban environment, security expectations run high around the clock. Residents and business owners demand reliable protection. A fully operational CCTV network provides this essential coverage.
These cameras serve dual purposes after sunset. They act as powerful visual deterrents to would-be offenders. They also become crucial evidence-gathering tools if incidents occur.
A malfunctioning system creates dangerous blind spots in your coverage. Missed events during night hours can have serious consequences. The false sense of security from apparently working equipment compounds the risk.
Technical verification of your surveillance isn’t about curiosity. It’s about confirming your primary defense layer remains active. Property protection depends on this fundamental assurance.
Darkness affects all areas differently than daylight conditions. Shadows lengthen and familiar spaces transform. Your CCTV must adapt to these changing visual environments.
Regular verification of nighttime performance prevents security gaps. It ensures continuous protection when you’re most vulnerable. This proactive approach eliminates uncertainty about your coverage status.
Understanding your equipment’s operational status provides genuine peace of mind. It transforms security from an assumption into a verified fact. Your investment in protection delivers its intended value consistently.
Understanding How CCTV Cameras See in the Dark
Seeing through darkness requires cameras to utilize alternative methods beyond standard visible light photography. Modern surveillance technology has evolved specific solutions for nighttime operation. These systems automatically adapt when ambient illumination drops below usable levels.
Different technologies address the challenge of low-light monitoring. Each approach has distinct advantages for various security scenarios. Understanding these methods helps interpret what your equipment can capture after sunset.
Infrared (IR) Night Vision Technology
Infrared night vision represents the most common solution for darkness. This technology uses IR LEDs positioned around the camera lens. These LEDs emit light invisible to human eyes but detectable by specialized sensors.
The camera’s sensor captures this reflected infrared illumination. It then processes the data into visible monochrome images. These typically appear as black-and-white footage with good clarity.
Most security cameras activate this mode automatically. A light sensor detects when ambient conditions become too dark for color recording. The switch happens seamlessly without manual intervention.
The Role of IR Cut Filters and LED Indicators
An IR cut filter is a crucial mechanical component in modern camera design. During daylight hours, this filter blocks infrared wavelengths from reaching the sensor. This blocking ensures accurate color reproduction in normal conditions.
At night, the filter physically moves out of the optical path. This movement allows infrared light to reach the sensor unimpeded. The transition happens quickly when the light sensor triggers night mode.
LED indicators provide visible confirmation of active night vision. The small red glow from IR led arrays serves as a primary status signal. Observing this glow confirms the camera has switched to its nighttime operational mode.
Comparing Low-Light, Thermal, and Smart IR Capabilities
Low-light cameras take a different approach to darkness. They feature larger, more sensitive image sensors rather than IR illumination. These sensors amplify available ambient light from stars, moon, or distant artificial sources.
The advantage lies in preserving color information in very dim conditions. Video quality remains in color longer than with standard IR systems. This technology excels in urban areas with some residual ambient lighting.
Thermal cameras represent another distinct technology category. They detect heat signatures rather than reflected light. Living beings and warm objects appear clearly against cooler backgrounds.
These cctv cameras perform consistently in complete darkness, fog, or smoke. Their performance depends on temperature differences rather than visible or infrared light.
Smart IR technology enhances standard infrared systems. It automatically adjusts the intensity of IR LEDs based on scene analysis. This prevents overexposure of close objects while properly illuminating distant areas.
The system intelligently balances illumination across the entire field of view. This results in more evenly lit footage with better detail preservation. It represents an evolutionary improvement in infrared surveillance technology.
How do I know if my CCTV is on or off at night? The Essential Checklist
Systematic verification of your protection system’s dark-hour readiness eliminates uncertainty through proven methods. This actionable checklist provides definitive answers about operational status. Follow these four verification steps for complete confidence in your surveillance coverage.
Each method offers different confirmation levels about your equipment’s functionality. Combining multiple checks delivers the most reliable assessment. This approach transforms guesswork into verified security assurance.
Visual Check 1: Observing Power and Status LED Lights
Begin with physical inspection of indicator lights on your equipment. Locate the power LED on your recorder unit, typically found on the front panel. A steady green illumination usually confirms adequate power supply to the cctv system.
Examine individual security cameras for their specific led indicators. Network activity lights often blink during data transmission. Consistent blinking patterns indicate normal connection and communication with the recorder.
Be aware of warning signals through these visual cues. A solid red light or rapid blinking may signal issues requiring attention. Authentic surveillance equipment typically shows steady illumination rather than theatrical blinking patterns.
Visual Check 2: Looking for Infrared Glow
This method provides direct confirmation of active night vision capabilities. Wait for complete darkness in the monitored area. Approach your installed camera carefully to observe its housing.
Look for the faint red glow emitted by infrared led arrays. This glow is often visible as small dots around the lens. Its presence confirms the unit has switched to nighttime operational mode.
Different models display varying intensity of this infrared illumination. Some cameras feature more noticeable glow than others. The key is detecting any infrared emission from the device after sunset.
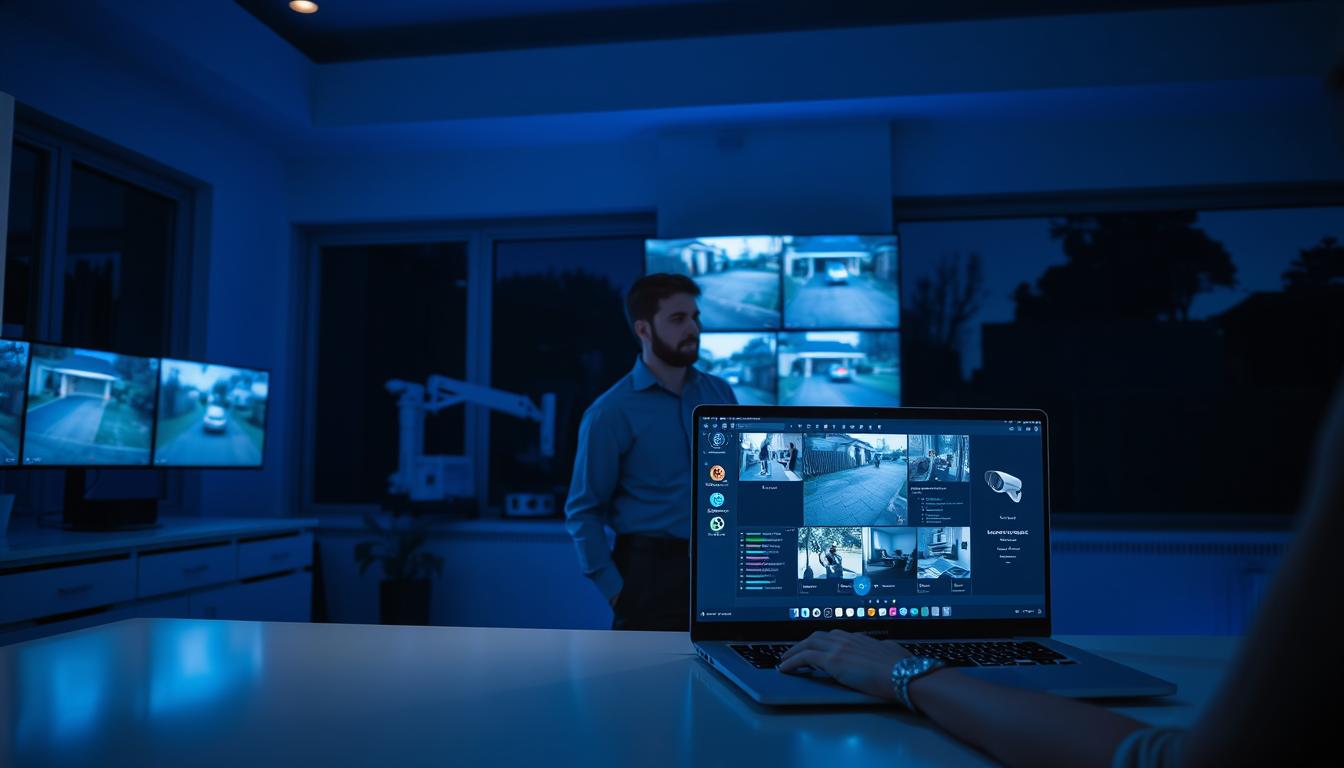
Digital Check 1: Accessing Live Feeds via Mobile App or Software
Modern surveillance systems offer remote viewing capabilities through dedicated applications. Launch your manufacturer’s mobile app or desktop software on a connected device. Successful login and connection represent the first positive sign.
Navigate to the live view section within the interface. Select each camera feed individually for inspection. A clear, real-time image confirms both power and functional data transmission.
Pay attention to image quality and refresh rates during this monitoring check. Smooth video playback without lag indicates optimal performance. This digital verification provides the most direct operational confirmation available.
Digital Check 2: Reviewing Recent Recorded Footage
Live viewing confirms current operation, while playback verification ensures historical recording. Access your system’s playback or archive section through the same interface. This function is typically labeled as “Playback” or “Recording Review.”
Select a camera and choose a recent time period, such as the last hour. Initiate playback of the stored footage. Watch for continuous recording without gaps or interruptions in the timeline.
Verify both image quality and timestamp accuracy during this review. Proper timestamps matching actual recording times confirm correct system operation. This final check completes the comprehensive verification process.
Performing all four checks provides complete operational assurance. A cctv system passing every verification point delivers reliable nighttime protection. Establish regular checks as part of your security maintenance routine.
This systematic approach to check cctv functionality eliminates uncertainty. You can confidently know cctv operational status through these verification methods. Consistent application ensures continuous protection when it matters most.
Listening and Observing for Active Camera Signs
Beyond lights and screens, your security equipment communicates its status through sound and motion. Advanced cameras offer physical signs of operation that complement digital verification methods. These cues provide on-site confirmation that your surveillance network remains active.
Motorized and intelligent camera models reveal their working state through mechanical behaviors. Listening carefully and watching for movement adds another verification layer. This approach works especially well for sophisticated security installations.
Physical indicators help confirm operational status in real-time. They offer immediate feedback without accessing software interfaces. Understanding these signs enhances your overall security awareness.
Audible Cues from PTZ (Pan-Tilt-Zoom) Cameras
Motorized PTZ units produce distinctive sounds during operation. These cameras contain internal mechanisms for directional adjustment. You might hear a faint whirring or servo noise when they activate.
The sounds occur during panning, tilting, or zooming functions. Movement can be manual or follow preset patrol patterns. Consistent, smooth mechanical noise indicates normal operation.
Listen for these cues during scheduled camera movements. Preset tours cause regular, predictable sound patterns. Manual control creates irregular but purposeful audible feedback.
Distinguish normal operational sounds from potential issues. Grinding, stuttering, or screeching noises suggest mechanical problems. These require professional attention to maintain optimal monitoring capability.
Environmental factors affect sound detection. Quiet conditions make cues more noticeable. Background noise in urban areas might mask subtle mechanical sounds.
Physical Movement and Auto-Tracking Functions
Visual observation of camera movement provides definitive activity confirmation. Seeing the unit change its viewing angle proves operational status. This applies particularly to cameras with tracking capabilities.
Auto-tracking models physically follow movement within their field of view. The lens smoothly pans and tilts to maintain subject focus. This happens automatically when the system detects motion.
Test this function by walking through monitored zones. Observe whether the camera adjusts its position to follow your path. Smooth, coordinated movement indicates proper tracking operation.
Fixed cameras lack this visible movement indicator. Their stationary nature means absence of motion doesn’t indicate malfunction. Different verification methods apply to various camera types.
Regular observation helps establish normal movement patterns. You’ll recognize scheduled patrol routines versus triggered tracking responses. This knowledge enhances your understanding of cctv operation.
Remember that advanced features require proper configuration. Auto-tracking depends on correctly set motion zones. Verifying these settings ensures your security cameras record relevant activity effectively.
Physical verification complements other checking methods. It provides immediate, tangible evidence of camera functionality. Combined approaches deliver the most reliable security assurance.
Using Your Smartphone as a DIY Detection Tool
Your everyday smartphone holds a surprising capability for security verification. This common device can serve as an impromptu diagnostic tool for your surveillance system. It provides a clever method to check cctv infrared operation without specialized equipment.
The technique leverages technology already in your pocket. Most modern mobile phones contain camera sensors sensitive to infrared wavelengths. These sensors detect what human eyes cannot perceive directly.
Here’s the simple science behind this trick. Infrared light falls just outside the visible spectrum for humans. Your smartphone camera lacks the same biological filters as your eyes.
The image sensor registers this infrared radiation. It typically displays the invisible light as a bright, purplish-white glow on your screen. This visual representation confirms active infrared emission.
Follow these straightforward steps to perform this verification:
- Ensure complete darkness in the room containing the security camera.
- Open your smartphone’s standard camera application.
- Point the phone’s lens directly at the surveillance camera housing.
- Observe your phone’s display for any unusual glow around the lens area.
A faint white or purple halo indicates active infrared led illuminators. This confirms the night vision function has engaged properly. The absence of such glow suggests potential issues with infrared emission.
This method proves particularly valuable for elevated installations. Checking ceiling-mounted or high-wall cameras becomes challenging from ground level. Your smartphone extends your visual reach to these difficult locations.
You can quickly know cctv operational status from a distance. No ladders or close physical inspection becomes necessary. The phone screen provides clear visual signs of infrared activity.
Remember this technique serves as a supplementary verification method. Some newer smartphone models incorporate stronger infrared filters in their cameras. These advanced filters might block the detection of CCTV infrared emissions.
Test your specific phone model to confirm its sensitivity. Older devices often work better for this purpose than latest-generation phones. The method remains valuable even with this limitation.
This DIY approach empowers property owners with immediate verification capability. You leverage existing technology for enhanced security awareness. It transforms everyday devices into practical diagnostic tools.
Combine this smartphone check with other verification methods for comprehensive assessment. Multiple confirmation points deliver the most reliable security assurance. Your surveillance system benefits from regular, multi-method validation.
Common Nighttime CCTV Problems and What They Mean
Even the most reliable surveillance systems can develop specific symptoms when darkness falls. Recognizing these visual patterns transforms vague concern into actionable diagnosis. This section helps you interpret what your camera footage reveals about underlying technical issues.
Different symptoms point to distinct root causes within your security setup. Understanding these connections empowers you to address problems effectively. We’ll examine four common nighttime cctv challenges and their likely explanations.
No Image or Complete Black Screen
A totally blank screen represents the most severe nighttime failure. This differs from a very dark but visible image with some details. Complete blackness typically indicates a total loss of power or signal.
Common causes include tripped circuit breakers or severed cables. Failed camera units also produce this symptom. Check your power supply connections and inspect cables for visible damage first.
Differentiate this from equipment in standby mode. Some systems show black screens when not actively recording. Verify your recording schedule matches your security needs.
Flickering Video, Static, or Signal Loss
Intermittent video problems suggest unstable connections or power fluctuations. These issues often appear as flickering images or sudden signal drops. The footage may cut in and out unpredictably.
Unstable power supplies cause voltage drops that disrupt camera operation. Loose or corroded cable connections create similar symptoms. For IP systems, network packet loss produces choppy footage.
BNC connectors in analog systems require particular attention. Ensure all connections remain secure and weatherproof. Consistent flickering warrants professional inspection of your electrical setup.
Poor Quality, Grainy, or Hazy Footage
Reduced image clarity makes identification difficult during critical moments. Grainy footage often results from insufficient infrared illumination. The camera struggles to capture details in complete darkness.
Dirty or fogged lenses scatter light and create hazy images. Regular cleaning maintains optimal night vision performance. Cameras with small sensors struggle in low-light conditions.
IR bounceback causes specific haze problems. The camera’s own infrared light reflects off nearby surfaces. Windows, walls, or shiny objects create bright white blobs in the video.
Persistent Black-and-White Image in Lit Areas
Cameras stuck in monochrome mode during daylight hours indicate filter malfunction. The IR cut filter should switch automatically based on ambient conditions. When stuck, it prevents color recording even with adequate light.
This mechanical failure keeps the filter in nighttime position permanently. The camera continues using infrared enhancement unnecessarily. Images remain black-and-white regardless of actual lighting conditions.
Differentiate this from normal night vision operation. Proper switching should occur at dawn and dusk. Persistent monochrome footage during bright hours requires technical attention.
Diagnosing these symptoms is the first step toward reliable solutions. Each visual clue points to specific components needing inspection. Your cctv system communicates its health through these signs.
Addressing root causes restores optimal surveillance performance. Proper maintenance prevents recurring problems. Understanding these common issues ensures your security investment delivers consistent protection.
Diagnosing Power and Connection Issues
The most frequent culprits behind nighttime surveillance failure are power supply and cable integrity. When a camera goes dark, the root cause is often electrical or physical. This section guides you through diagnosing these fundamental problems.
Understanding these technical issues helps you restore security quickly. A methodical approach isolates the fault. You can then apply the correct fix or provide clear information to a technician.
Checking for Voltage Drops and Inadequate Power Supply
Voltage drop is a common power problem in extended cctv installations. It happens when cameras are too far from their supply. Thin cables over long distances cannot deliver sufficient voltage.
The system may show strange symptoms. You might see a pinkish or greenish tint on the video feed. Intermittent operation or complete failure during peak demand are other signs.
Check your camera’s voltage specification. Most require 12V DC. Use a multimeter to test the voltage at the camera end of the cable while powered on. A reading significantly below the required level confirms a voltage drop.
Solutions include using a thicker gauge cable or installing a power booster. Relocating the power adapter closer to the camera can also help. Proper planning during initial setup prevents this issue.
Inspecting Cables and Connectors for Damage
Physical inspection of your connection network is crucial. Environmental stress and pests can damage cables over time. Faulty connections cause black screens or flickering signals.
Follow this visual inspection routine:
- Examine the entire cable run for cuts, deep crimps, or chew marks from rodents.
- Check connector points like BNC (for analog) or RJ45 (for IP cameras). Look for corrosion, bent pins, or loose fittings.
- Inspect power adapters and PoE equipment. Feel for unusual heat. Ensure the indicator light is on.
Weatherproofing failures are a major cause of corrosion in Singapore’s humid climate. Ensure all outdoor connections are properly sealed. Replace any damaged components immediately to restore video quality.
Testing with a Multimeter or Professional Monitor
For those comfortable with tools, a multimeter provides definitive diagnosis. It measures voltage and continuity. This isolates whether a problem is with the power source, cable, or camera.
Always prioritize safety when performing electrical diagnostics. Ensure the system is powered correctly before testing. Use the multimeter’s DC voltage setting at the camera’s power input terminals.
A portable test monitor is the professional’s tool of choice. Connect it directly to a camera’s output. This bypasses the main recorder or network switch.
If the test monitor displays a clear picture, the fault lies in your main system (DVR/NVR). If the picture remains poor or absent, the issue is with that specific camera or its cable run. This method provides clear, actionable results.
Environmental Obstructions That Disable Night Vision
Your CCTV system’s electronics might function perfectly while environmental conditions render them useless. External factors create problems that internal diagnostics cannot detect. These issues sabotage surveillance effectiveness without triggering system alerts.
Nature and urban surroundings conspire against clear nighttime monitoring. They degrade night vision performance through physical interference and optical challenges. Understanding these obstacles is essential for maintaining reliable security coverage.
Three primary environmental factors commonly disrupt surveillance after dark. Each requires specific prevention strategies and maintenance routines. Addressing them ensures your investment delivers consistent protection.
Spider Webs, Dust, and Debris on the Lens
Physical obstructions on the lens scatter infrared light unpredictably. A single spider web strand creates blurry streaks across surveillance footage. Dust accumulation produces hazy, indistinct images that compromise identification.
These seemingly minor contaminants have major consequences. They diffuse the camera’s own infrared illumination. This scattering effect reduces contrast and detail in captured footage.
Dome housing cameras are particularly vulnerable to this issue. Their curved surfaces collect dust and attract spider activity. Regular cleaning prevents gradual performance degradation.
Establish a monthly inspection routine for all outdoor units. Use appropriate cleaning solutions and soft microfiber cloths. Avoid abrasive materials that could scratch protective coatings.
Light Pollution, Glare, and Reflective Surfaces
Urban environments create challenging lighting conditions after sunset. Streetlights, neon signs, and vehicle headlights produce intense glare. This glare overwhelms camera sensors and washes out important details.
Direct light sources pointed at the lens cause lens flare. This optical phenomenon creates bright streaks across the image. It blinds the camera to activity in shadowed areas.
Reflective surfaces amplify these lighting problems. Windows, polished metal, and wet pavement bounce light unpredictably. These reflections create confusing patterns in surveillance footage.
Strategic positioning helps mitigate light pollution challenges. Angle cameras away from direct light sources whenever possible. Consider cameras with adjustable exposure settings for high-contrast environments.
Incorrect Camera Positioning Causing IR Bounceback
Infrared bounceback represents a common installation error. It occurs when a camera’s own IR LEDs reflect off nearby surfaces. This creates a bright white blob that obscures the entire field of view.
Mounting cctv cameras too close to walls or ceilings causes this issue. The infrared light bounces directly back into the lens. Windows and shiny surfaces produce particularly severe bounceback.
Proper setup distance prevents this frustrating problem. Maintain adequate clearance between the camera and any surface. Angling the unit slightly downward often provides a simple solution.
Varifocal lens cameras offer additional adjustment capabilities. They allow fine-tuning of the field of view to avoid reflective surfaces. This flexibility proves valuable in challenging installation environments.
Environmental factors demand ongoing attention and maintenance. They demonstrate that hardware quality alone cannot guarantee performance. Regular inspection and proper installation work together for optimal night vision results.
Preventative Maintenance for Reliable Night Performance
Proactive care transforms your surveillance from reactive troubleshooting to reliable protection. A structured maintenance plan prevents the failures discussed earlier. This approach ensures your security investment delivers consistent nighttime coverage.
Regular upkeep addresses both physical and digital components of your setup. It combines cleaning, software management, and settings verification. This holistic strategy maintains optimal performance through changing seasons.
A small time investment in scheduled care prevents major security headaches. It turns sporadic worry into systematic confidence. Your surveillance remains dependable when it matters most.
Establishing a Regular Cleaning and Inspection Schedule
Dust and debris accumulate on outdoor equipment over time. Singapore’s humid climate accelerates this process. Quarterly cleaning maintains clear visibility for your cameras.
Use a soft, lint-free cloth with appropriate lens cleaner. Gently wipe the camera housing and lens surface. Avoid abrasive materials that could scratch protective coatings.
Inspect each unit for water ingress signs. Check cable connections for wear or corrosion. Tighten any loose fittings to maintain weatherproof integrity.
This physical maintenance preserves image quality. Clean lenses transmit infrared light effectively. Proper housing protection ensures long-term equipment reliability.
Keeping Firmware and System Software Updated
Manufacturers release updates to enhance security and functionality. These patches often improve night vision algorithms. They can fix bugs affecting motion detection accuracy.
Regularly check your vendor’s website or mobile app. Look for available firmware updates for your specific model. Follow the provided instructions for safe installation.
Updated software maintains compatibility with modern networks. It can add new features to existing hardware. This extends the useful life of your surveillance investment.
Schedule these updates during low-activity periods. Test the system thoroughly afterward. Confirm all cameras reconnect and function properly.
Verifying Storage Health and Recording Settings
Your surveillance system depends on reliable data storage. Regularly check your DVR or NVR’s hard drive status. Most interfaces display available space and drive health indicators.
Ensure overwrite settings are configured correctly. This prevents recording gaps when storage fills. Test playback from different time periods to verify data integrity.
Confirm that date and time stamps remain accurate. This detail is crucial for any evidentiary needs. Synchronize your system with reliable time servers when possible.
Review motion detection zones and sensitivity settings. Adjust them based on seasonal changes in your environment. Test these settings during both day and night conditions.
Maintain a simple log to track your maintenance activities. Record cleaning dates, firmware versions, and any observed issues. This documentation helps identify patterns in equipment performance.
Consistent maintenance transforms security from an assumption into a verified reality. Your proactive approach ensures uninterrupted protection. Nighttime monitoring remains reliable through systematic care.
Optimizing Camera Placement for Maximum Night Coverage
The physical location and orientation of your cameras directly impact their nighttime effectiveness. Strategic positioning transforms adequate equipment into exceptional security. It ensures your investment delivers clear, usable footage when visibility matters most.
Proper setup considers both technical specifications and environmental realities. You must match hardware capabilities with real-world conditions. This approach maximizes every camera’s potential after sunset.
Singapore’s unique urban landscape presents specific challenges. Buildings, foliage, and artificial lighting all affect surveillance performance. Thoughtful placement addresses these factors directly.
Follow these strategic tips to enhance your nighttime monitoring. They apply to both new installations and existing system audits. Small adjustments can yield significant improvements.
Ideal Height, Angles, and Avoiding Blind Spots
Mounting height represents a critical balance in security design. The optimal range is typically eight to ten feet above ground level. This position discourages tampering while maintaining a useful field of view.
Angle your camera slightly downward toward key entry points. Focus on doors, gates, and driveway approaches. Avoid pointing at blank walls or empty sky, which wastes valuable image detail.
Eliminate blind spots through careful planning. Test sightlines from potential intruder approaches. Ensure overlapping coverage between multiple cctv cameras for complete monitoring.
Consider these placement guidelines:
- Cover all entry points with clear, unobstructed views
- Minimize backlighting from streetlights or windows
- Use wide-angle lenses strategically for area coverage
- Test camera views during both day and night conditions
Balancing Ambient Light and IR Illumination Range
Your camera’s infrared capabilities must match the scene it monitors. Check the specified IR range before installation. A unit with thirty-foot illumination cannot properly cover a hundred-foot yard.
Existing ambient light can supplement your night vision system. Porch lights or streetlamps provide additional illumination. This supplemental lighting may even allow color recording in low-light conditions.
Position cameras to leverage available light sources effectively. Avoid pointing directly at bright lights, which causes lens flare. Instead, use ambient light to enhance overall scene visibility.
Conduct nighttime tests to verify illumination coverage. Walk through monitored areas while checking live feeds. Ensure critical zones receive adequate infrared or ambient lighting.
Securing and Weatherproofing Your Installations
Physical protection ensures your surveillance equipment survives Singapore’s climate. Use IP67-rated housings for all outdoor installations. This rating guarantees protection against dust and water immersion.
Secure mounting hardware deters vandalism and tampering. Anti-tamper brackets and security screws add an extra layer of protection. Make unauthorized removal difficult for potential intruders.
Protect cable runs with proper conduit or trunking. This prevents weather damage and rodent chewing. It also presents a cleaner, more professional installation appearance.
Regular maintenance preserves weatherproof integrity. Check seals and gaskets during seasonal inspections. Replace any compromised components immediately to maintain protection.
These placement principles create a foundation for reliable nighttime security. They ensure your cameras capture usable evidence when incidents occur. Proper installation turns technical specifications into practical protection.
When and How to Use Advanced Diagnostic Tools
Advanced diagnostics move verification from observation to precise electronic measurement. These tools are for situations where standard checks prove inconclusive.
Visual inspections and app logins might not reveal subtle transmission failures. Technical equipment provides a definitive answer. This approach is ideal for advanced users or complex security setups.
We will explore two categories of professional-grade verification. First, radio frequency detectors for wireless cameras. Second, network analysis tools for modern IP-based systems.
The Role of Electronic Bug and RF Signal Detectors
Wireless surveillance equipment broadcasts a constant radio frequency (RF) signal. A handheld RF detection device can sense this transmission. It confirms the camera is actively sending data, even if the feed appears offline.
These detectors scan for specific frequency ranges used by common devices. A positive reading, often shown as a beep or visual signal, confirms activity. It is a powerful tool for verifying wireless connection integrity.
This method is particularly useful for hidden or disguised units. It provides physical proof of transmission beyond any software interface. For troubleshooting, it isolates whether a problem is with the camera or the receiver.
Interpreting Network Tools for IP Camera Systems
Modern IP-based cctv systems are network devices. Standard computer networking tips and tools apply directly to them. Basic command-line diagnostics offer a clear status report.
The “ping” command is the most fundamental network test. Open a command prompt on a computer connected to the same network. Type ping [camera’s IP address] and press enter.
A successful reply confirms the camera is powered and communicating on the network. Timeout errors indicate a loss of network connectivity. This simple test can instantly rule out major network issues.
For a broader view, network scanning software is invaluable. Tools like Angry IP Scanner or Advanced IP Scanner discover all active devices on your local network.
These programs list each device’s IP address, hostname, and manufacturer. You can quickly see if all your cameras are present and responding. Some manufacturer-provided tools can even report device health and data stream status.
Remember, these are advanced diagnostic steps. For most users, the visual and digital checks covered earlier are perfectly sufficient. These technical tools represent the final layer in a comprehensive verification strategy.
They empower you to move from suspicion to certainty. When simpler methods fail, these diagnostics provide the answers needed to restore complete security coverage after dark.
Setting Up Alerts for Proactive Monitoring
Transforming your security system from passive observer to active sentinel begins with smart notification settings. Modern surveillance technology offers intelligent features that provide continuous status updates. This approach moves you from reactive checking to proactive assurance.

Your equipment can become an intelligent partner in protection. It informs you of events as they unfold. This eliminates constant manual verification of your coverage.
Configuring Motion Detection and Push Notifications
Proper motion detection setup is crucial for effective alerts. Begin by accessing your system’s configuration software. Navigate to the motion detection settings for each camera.
Draw specific zones on the camera’s field of view. Focus on critical areas like doors, gates, and pathways. Avoid zones with moving foliage or shifting shadows.
Adjust sensitivity levels to match your environment. Higher settings catch smaller movements but may cause false alarms. Finding the right balance ensures real events trigger notifications.
Push notifications deliver instant alerts to your smartphone. Configure these through your manufacturer’s mobile application. Each alert can include a snapshot or short video clip.
Receiving these notifications provides ongoing proof of active monitoring. It confirms your cameras are observing and recording events. This direct feedback builds confidence in your security coverage.
Using Scheduled Reports and System Health Dashboards
Many advanced systems offer comprehensive health dashboards. These interfaces provide an at-a-glance view of your entire setup. You can quickly see all camera connections and their status.
Dashboards display crucial information like storage usage and system uptime. They highlight any cameras that have gone offline unexpectedly. This allows for immediate response to potential issues.
Scheduled email reports offer another layer of assurance. Configure these to arrive daily or weekly in your inbox. They summarize system activity and flag any anomalies.
These reports confirm consistent recording performance over time. They document which cameras captured motion events during specific periods. Reviewing them helps you know the signs of proper nighttime operation.
Automated monitoring transforms your approach to security management. It provides continuous status updates without manual intervention. Your system becomes an active partner in property protection.
Implementing these features creates a robust security framework. You gain peace of mind through automated verification. Your surveillance investment delivers maximum value with minimal effort.
Recognizing When to Call a Professional Technician
Certain surveillance challenges require specialized knowledge that goes beyond basic DIY solutions. While many issues can be resolved with careful troubleshooting, some situations demand expert intervention. Knowing when to seek professional help ensures your security investment delivers long-term reliability.
Professional technicians bring diagnostic tools and experience that solve complex system problems. They understand the intricacies of modern surveillance technology. Their expertise transforms frustrating issues into reliable solutions.
Persistent Issues Beyond Basic Troubleshooting
Recurring problems despite your best efforts signal deeper technical faults. If a cctv camera continues malfunctioning after cleaning and rebooting, internal hardware may be damaged. A failing image sensor or power board requires professional replacement.
Complex network configuration often baffles even tech-savvy users. IP camera systems with multiple VLANs or advanced routing need specialized setup. Port forwarding errors and firewall conflicts are common issues needing expert resolution.
New cable installations represent another professional domain. Running wires through walls, ceilings, or underground requires proper tools and techniques. Professionals ensure cables are protected, concealed, and meet local electrical codes.
Consider professional help for these specific situations:
- Intermittent video loss that continues after checking all connections
- Suspected internal component failure in cameras or recorders
- Advanced network integration with existing business systems
- Major system expansion requiring new wiring infrastructure
Benefits of Expert Installation and Regular Servicing
Professional installation establishes a solid foundation for your surveillance system. Experts follow industry best practices that DIY installations often miss. They calculate voltage requirements precisely to prevent power drops.
Weatherproofing receives meticulous attention during professional setup. Proper sealing of cable entries and connectors prevents moisture damage. This is crucial in Singapore’s humid climate where corrosion develops quickly.
Cable management by professionals enhances both aesthetics and durability. Neat trunking and conduit protect wires from environmental stress. Organized installations simplify future maintenance and troubleshooting.
Optimal camera placement maximizes your surveillance coverage. Professionals analyze sightlines and lighting conditions thoroughly. They position cameras to avoid glare, reflections, and blind spots.
Regular maintenance by professionals prevents gradual performance degradation. Annual service contracts typically include comprehensive system checks. Technicians perform deep lens cleaning that restores image clarity.
Firmware updates and performance optimization maintain system efficiency. Professionals test recording integrity and storage health during service visits. They identify potential issues before they cause security gaps.
Finding a Reputable CCTV Specialist in Singapore
Selecting the right provider ensures quality workmanship and reliable support. Singapore’s security industry has specific licensing requirements for professionals. Verify that any technician holds proper certification from relevant authorities.
The Police Licensing & Regulatory Department oversees security service providers. Licensed companies demonstrate compliance with national standards. They carry appropriate insurance coverage for installation work.
Experience matters significantly in surveillance technology. Look for providers with several years of field experience. Specialists familiar with various cctv brands understand their unique characteristics.
Strong warranty terms indicate confidence in work quality. Reputable companies typically offer two-year warranties on labor and parts. This protection gives peace of mind for your security investment.
Customer testimonials provide valuable insight into service quality. Read independent reviews on multiple platforms. Look for consistent praise regarding professionalism and problem-solving ability.
Transparent pricing prevents unpleasant surprises. Request detailed quotations that itemize all costs. Reputable providers explain their pricing structure clearly.
For professional assessment of your surveillance system, consider contacting established specialists. Companies like CCTV Maintenance Singapore offer comprehensive diagnostic services. Their technicians can identify and resolve complex security problems efficiently.
Professional expertise transforms surveillance from a technical challenge into reliable protection. The right technician ensures your cameras perform optimally day and night. This investment in professional solutions delivers lasting security confidence.
Ensuring Your Peace of Mind After Dark
True security confidence comes from verified protection, not just installed equipment. Knowing your cctv system operates reliably after dark is fundamental to this assurance. It transforms technical solutions into genuine peace of mind.
The most reliable approach combines multiple verification methods. Visual inspections, digital monitoring, and regular maintenance work together. This layered strategy ensures complete security coverage throughout the night.
Apply the knowledge from this guide to answer that critical question with confidence. Understanding cctv operation and performing regular checks empowers you. You can take immediate action if any issues arise.
Your surveillance network represents more than cameras alone. It’s an investment in safety, deterrence, and comfort. Start with a comprehensive check today to ensure your property remains protected.
FAQ
What is the simplest way to confirm my security camera is active after dark?
The fastest method is to look for the infrared glow. In total darkness, most surveillance cameras emit a faint red light from their IR LEDs. You can also use the mobile app from brands like Hikvision or Dahua to view a live feed and verify the status.
Why does my video footage turn black and white at night?
This is normal operation for systems with infrared night vision. The camera switches to a monochrome mode to maximize light sensitivity. An internal IR cut filter moves to allow IR light to hit the sensor, providing clearer images than a full-color mode could in low light.
My camera shows a completely black screen. What should I check first?
A> Start with the power supply. Ensure all connections are secure and the adapter is plugged in. Next, check the lens for obstructions like spider webs or thick dirt. Finally, log into the system’s software to see if the camera is online and if its night vision settings are enabled.
Can I use my phone to test if the infrared lights are working?
Yes. The camera sensors in most smartphones can see infrared light that is invisible to the human eye. Point your phone’s camera at the security device in a dark room. If you see a bright white or purple glow on your screen, the IR LEDs are active.
How often should I perform maintenance on my surveillance system?
A simple visual inspection and lens cleaning every three to six months is recommended. Regularly check for firmware updates from the manufacturer, such as Axis or Uniview, to fix bugs and improve performance. Also, verify that your hard drive has free space for continuous recording.
What causes grainy or hazy video quality during nighttime monitoring?
Graininess often stems from insufficient infrared illumination or a camera with a low-quality sensor. Haze can be caused by IR bounceback from a nearby wall or window. Repositioning the unit and ensuring the lens is clean usually improves the video quality significantly.
When should I call a professional technician for help?
Contact a specialist if you experience persistent power issues, complex network configuration problems, or physical damage to cables and housings. Professional installation by a certified technician from a reputable Singapore security company also ensures optimal placement and long-term reliability.


