What does a green light on a camera mean? A Guide
Many photographers notice a small green light on their equipment but don’t understand its purpose. This visual indicator appears on various devices from security systems to smartphones. It serves as a universal signal across different brands and models.
Understanding your device’s visual language is crucial for optimal performance. The glowing symbol communicates important operational status information. It relates to power, connectivity, and even privacy functions.
This guide will help you interpret what your equipment is telling you. You’ll gain practical knowledge for both technical understanding and creative photography. Let’s explore the significance behind this common indicator.
Key Takeaways
- The green indicator is a universal signal across camera devices
- It communicates important operational status information
- Understanding this light helps optimize your photography experience
- The indicator relates to power, connectivity, and privacy functions
- This knowledge applies to security cameras, smartphones, and professional equipment
- Interpreting visual signals enhances both technical and creative skills
Understanding Your Camera’s Visual Language
Modern photography equipment speaks through light. These visual signals form a universal language that communicates your device’s status instantly. Learning this visual vocabulary transforms how you interact with your gear.
Manufacturers design these indicators to bridge technical complexity and user understanding. They follow standardized color systems across brands and models. This consistency helps photographers quickly assess their equipment’s condition.
The Purpose of Indicator Lights
Camera lights camera systems serve as essential communication tools. They translate technical status information into simple visual cues. These LEDs provide immediate feedback without menu navigation.
Manufacturers typically use green to indicate active recording functions. The purpose extends beyond basic operations to include privacy notifications. Professional photographers rely on these visual cues during critical shoots.
Different brands may implement slight variations in their indicator systems. However, the fundamental principles remain consistent across devices. Modern cameras use both solid and flashing patterns to convey different status alerts.
Why Paying Attention to Lights Matters
Monitoring these visual indicators prevents missed shooting opportunities. It helps avoid technical problems during important moments. This awareness enhances both technical performance and creative outcomes.
Understanding your device’s camera indicators provides better control over privacy and security. It helps users identify when their equipment is active. This knowledge is particularly valuable for security camera systems in Singapore homes and businesses.
Recognizing these signals builds confidence in your equipment’s operation. It transforms complex technical data into actionable information. This understanding ultimately leads to better photography results and equipment management.
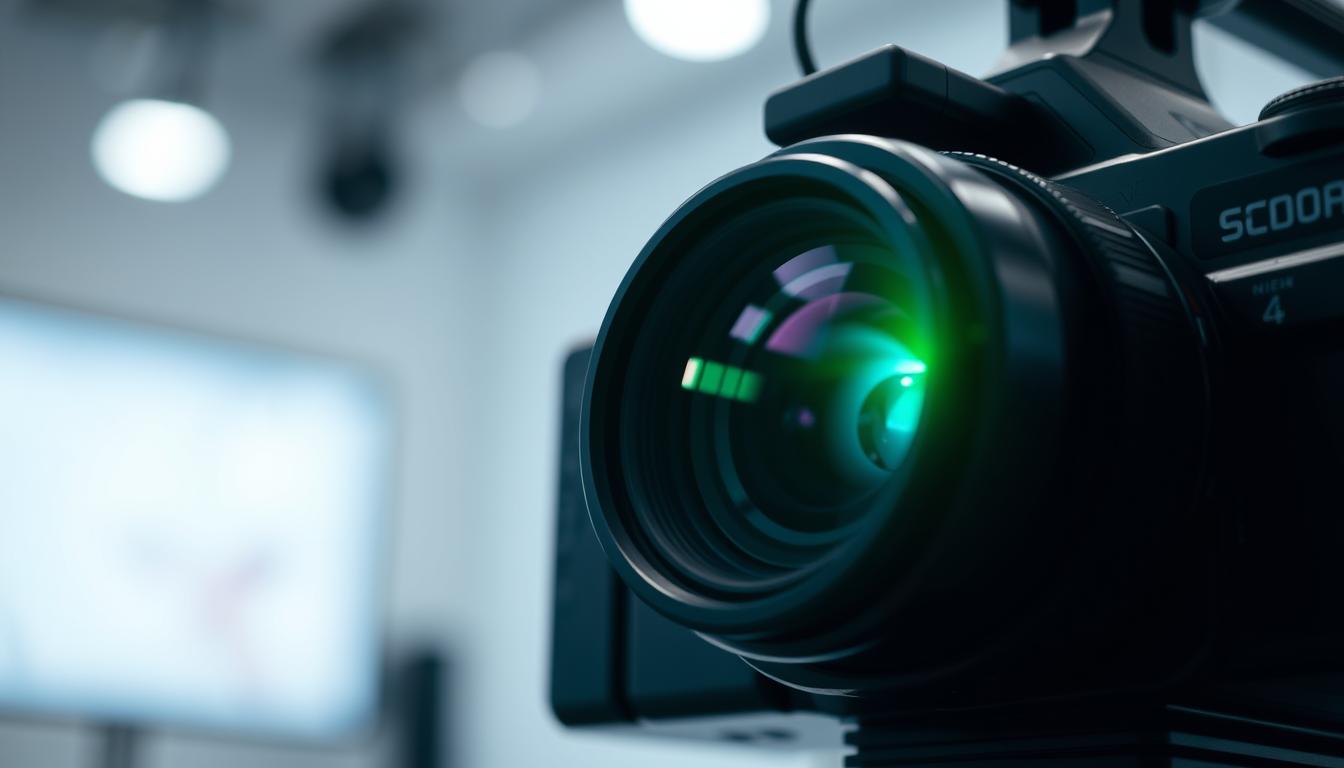
What Does a Green Light on a Camera Mean? The Core Definition
Camera manufacturers designed this visual communication system for immediate understanding. The glowing indicator serves as a universal language across photography equipment. It provides instant feedback about your device’s operational condition.
This visual signal represents one of the most fundamental communications from your equipment. It translates complex technical information into simple visual cues. Understanding this basic definition enhances your photography experience significantly.
Primary Indicator of Power and Connectivity
The steady glow primarily confirms electrical power and data connectivity. Your device communicates that it’s properly connected to its intended network or data source. This dual confirmation happens simultaneously through a single visual cue.
When you see this indicator, your equipment has established stable power supply. It also maintains connection to its required data pathways. This combination ensures the device can perform its intended functions properly.
Professional photographers rely on this confirmation before important shoots. It prevents technical issues during critical moments. The assurance of proper connectivity helps avoid missed opportunities.
A Signal of Operational Readiness
This visual confirmation indicates optimal operational status. Your equipment is functioning correctly and prepared for immediate use. The steady glow means all essential systems work within normal parameters.
The indicator acts as validation that your device can perform recording or streaming functions. It serves as a fundamental communication tool between equipment and user. This immediate status information requires no menu navigation or technical knowledge.
Different camera types maintain this consistent meaning across brands and models. Some manufacturers may add brand-specific additional indications. However, the core operational readiness signal remains universally understood.
Understanding this basic definition is crucial for proper equipment operation. It helps users troubleshoot potential issues more effectively. This knowledge builds confidence in your device’s performance capabilities.
Solid Green vs. Flashing Green: Interpreting the Patterns
Your equipment communicates through distinct visual patterns that reveal its operational status. These light variations provide immediate insight into what’s happening with your photography gear. Understanding these signals helps you respond appropriately to your device’s needs.
Different flash rhythms convey specific messages about your equipment’s condition. The steady glow versus intermittent blinking represents two fundamentally different operational states. Mastering this visual language gives you greater control over your photographic tools.
The Meaning of a Steady, Solid Green Light
A consistent, unchanging glow indicates optimal operational readiness. This solid green pattern means your equipment maintains stable power and network connectivity. Your device confirms it’s properly configured and prepared for immediate use.
This visual confirmation shows all systems function within normal parameters. The camera light remains steady during recording or standby mode. It signals that no active data transfer processes are currently occurring.
Professional photographers rely on this assurance before important sessions. The stable glow prevents technical surprises during critical moments. It represents the ideal condition for capturing perfect shots.
What a Flashing or Blinking Green Light Indicates
An intermittent glow signals active communication between devices. This flashing green pattern indicates ongoing data transmission processes. Your equipment is either sending or receiving information through its networks.
The blinking rhythm provides additional clues about the activity type. Slow pulses often indicate routine data transfer between connected systems. Rapid blinking may signal firmware updates or connection attempts.
Different manufacturers use specific flash sequences for various status conditions. Some brands implement coded patterns for specialized messages. Understanding these variations helps troubleshoot connectivity issues effectively.
This dynamic activity shows your device is actively processing information. The flashing green indicator appears during initial setup procedures. It also activates when establishing new network connections.
Consult your equipment manual for brand-specific pattern interpretations. This knowledge helps distinguish between normal operation and situations requiring attention. Recognizing these signals ensures proper camera light functionality and performance.
Green Light Indicators on Different Types of Cameras
Various photography equipment implements this visual signal differently based on their design and purpose. The implementation varies between physical LEDs and software-based indicators.
Each device category maintains the core meaning while adapting to specific user needs. Understanding these variations helps you interpret your equipment correctly.
IP and Security Cameras
Network-connected surveillance equipment uses this indicator for connectivity confirmation. The DCS-2100 model shows a solid glow when properly linked to networks.
Security systems often combine multiple colored lights for comprehensive status reporting. These devices maintain visual communication for both technical and privacy purposes.
Professional surveillance cameras implement sophisticated indicator systems. They provide detailed operational status through various light patterns.
Smartphone and Mobile Device Cameras
Modern smartphone cameras use software-based indicators for privacy protection. Android’s green dot appears when applications access imaging functions.
Mobile devices implemented these visual alerts in response to privacy concerns. The system provides immediate notification of camera activation.
This approach balances technical functionality with user awareness. It represents the evolution of visual indicators in digital photography.
Webcams and Built-in Laptop Cameras
USB-connected imaging devices typically use physical LED indicators. They maintain steady illumination during active recording sessions.
Built-in laptop cameras follow similar principles across different models. The green glow confirms proper connection and operational readiness.
These implementations prioritize user-friendly operation while maintaining core functionality. The consistent visual language ensures intuitive understanding across devices.
The Critical Role of the Green Light in Privacy and Security
Privacy protection begins with understanding your device’s visual communications. The illuminated indicator serves as your first line of defense against unwanted surveillance. This simple glow carries significant weight in today’s connected world.
Your Built-in Alert Against Unauthorized Access
This visual signal acts as a constant guardian of your personal space. It provides immediate awareness when your imaging functions activate. The indicator ensures you always know when recording begins.
Security-conscious users rely on this feature to prevent unwanted access. It makes camera activity visibly apparent to everyone nearby. This transparency protects against remote activation without knowledge.
How It Relates to Data Protection Regulations
Singapore’s Personal Data Protection Act (PDPA) mandates clear visual indicators. These requirements ensure transparency when devices use camera functions. The green dot fulfills these legal obligations effectively.
“Organizations must notify individuals of the purposes for which they collect, use, or disclose personal data.”
International regulations continue evolving around camera indicators. New requirements often demand more prominent notifications. Understanding this role helps users appreciate their device’s protective features.
Proper settings management enhances this built-in security function. Regular checks ensure your visual indicators function correctly. This maintenance supports ongoing privacy protection and regulatory compliance.
How Smartphones Use the Green Light for Transparency
Mobile devices have transformed camera indicators from simple hardware features into sophisticated privacy tools. Smartphone manufacturers now implement software-based visual alerts that provide detailed access information. These systems offer users unprecedented transparency about which apps use their camera functions.
Modern mobile operating systems display subtle but powerful visual cues. These indicators appear automatically whenever camera hardware activates. Users gain immediate awareness without checking complex settings menus.
The Android 12 Green Dot and Access Notification
Android 12 introduced a small green dot in the status bar. This visual alert appears when any application accesses the camera. The system provides clear notifications about active imaging functions.
Tapping the indicator reveals which specific app is using the camera. This immediate feedback helps users identify unexpected access attempts. The feature works across all Android 12 and later devices.
Samsung enhances this system with additional color-coding in their One UI interface. Their implementation provides persistent visual reminders during camera use. This approach offers extended transparency for security-conscious users.
iOS Camera and Microphone Indicators
Apple’s iOS platform uses orange indicators for camera access. The system shows green when both camera and microphone activate simultaneously. These color-coded alerts appear in the dynamic island or status bar.
iOS maintains detailed privacy dashboards that log historical access. Users can review which applications used their camera and when. This information helps identify potentially suspicious app behavior.
Both mobile platforms share common privacy protection goals. They make camera access transparent and easily traceable. Understanding these systems helps users maintain better control over their personal data.
Mobile indicators typically appear regardless of whether the camera viewfinder is visible. This ensures users always know when their imaging hardware activates. These implementations represent the evolution from physical LEDs to intelligent software solutions.
How to Check Which App is Accessing Your Camera
Taking command of your device’s camera access requires understanding permission management systems. Modern smartphones provide detailed controls for monitoring application usage. These tools help maintain privacy and security awareness.
Both major mobile platforms offer intuitive methods for reviewing camera permissions. Regular checks ensure you maintain complete control over your imaging hardware. This practice prevents unexpected access attempts.
Steps for Android Devices
Android users can navigate to Settings > Privacy > Permission manager > Camera. This menu displays all applications with camera access permissions. You can review and modify each app’s authorization level.
The privacy dashboard provides historical information about camera usage. It shows when specific apps accessed your imaging hardware. This feature helps identify patterns of use over time.
Quick settings offer immediate access to permission information. Users can toggle camera access without deep menu navigation. This streamlined approach enhances daily privacy management.
Steps for iOS Devices
iOS users should open Settings > Privacy & Security > Camera. This section lists all applications requesting camera permissions. Each entry shows current authorization status clearly.
Recent iOS versions include privacy reports featuring historical data. These reports detail when apps used camera functions. The information helps maintain ongoing security awareness.
Both platforms allow temporary permission grants for single use. This option provides flexibility while maintaining control. Users can approve one-time access without permanent authorization.
Regular permission reviews ensure optimal privacy protection. Understanding these procedures empowers users significantly. Proper settings management prevents unwanted camera activation.
Common Reasons for a Steady Green Light
Photography equipment communicates operational status through consistent visual signals. A steady glow represents one of the most reassuring indicators users encounter. This unchanging illumination conveys multiple positive conditions simultaneously.
Understanding these common scenarios helps photographers quickly assess their gear’s condition. The solid appearance eliminates guesswork about device functionality. It provides immediate confidence in your equipment’s performance capabilities.
Stable Power and Network Connection
A consistent glow confirms reliable electrical supply to your device. The indicator shows adequate current flow for proper operation. This assurance prevents unexpected shutdowns during critical moments.
The steady signal also indicates successful network linkage. Your equipment maintains stable communication with connected systems. Both wired and wireless configurations produce this positive confirmation.
This dual verification happens through a single visual cue. Users gain immediate knowledge about both essential connections. The combination ensures optimal performance conditions.
Device is Active and Ready for Use
The unchanging glow signals completed startup procedures. All systems function within normal operational parameters. Your equipment stands prepared for immediate activation.
This status means recording or streaming can begin instantly. The device monitors its environment continuously. No technical issues currently affect performance capabilities.
Network-connected models remain available for remote configuration. Users can access settings through appropriate applications. This readiness applies across various photography scenarios.
Security systems maintain constant vigilance in this state. They capture events without requiring additional preparation. The indicator provides peace of mind about surveillance coverage.
Understanding these common reasons enhances equipment management. Users develop quicker assessment skills for technical status. This knowledge supports better photography experiences overall.
Troubleshooting Camera Light Issues
Equipment indicators sometimes behave unexpectedly, requiring immediate attention to restore proper functionality. These visual signals provide crucial feedback about your device’s operational condition. When they malfunction, understanding basic diagnostic procedures becomes essential.
Diagnosing a Missing Green Light
Begin your troubleshooting process with power verification. Ensure your equipment receives adequate electrical current through proper connections. Test different outlets or USB ports to eliminate power source problems.
Inspect all cables thoroughly for visible damage or wear. Faulty wiring often causes indicator issues before affecting primary functions. Replace questionable cables immediately to prevent further complications.
Network-dependent devices require additional connectivity checks. Verify internet stability and router functionality when the indicator remains dark. These steps help identify whether the problem originates from your equipment or supporting systems.
Fixing an Unstable or Erratic Indicator
Intermittent indicator behavior often signals software-related issues. Check for available firmware updates through your device’s settings menu. Manufacturers frequently release patches addressing such performance problems.
USB-connected cameras benefit from powered adapters or hubs. These provide consistent current flow that stabilizes indicator function. Always verify port settings and driver compatibility for optimal performance.
Simple restart procedures resolve many temporary glitches. Power cycle your camera and networking equipment simultaneously. This clears cached errors and reestablishes proper communication pathways.
Bandwidth verification ensures network cameras operate smoothly. Insufficient upload speeds cause indicator instability during streaming. Singapore users should check their fiber broadband plans for adequate capacity.
Understanding these diagnostic steps empowers users to maintain equipment reliability. Quick resolution of indicator issues ensures uninterrupted photography experiences. Proper maintenance prevents minor problems from evolving into major malfunctions.
Notable Differences in Indicators Across Camera Brands
Camera manufacturers develop unique visual languages through their indicator systems. These variations reflect different design philosophies and technical approaches. Learning these brand-specific differences enhances your equipment mastery.
Each company implements distinctive color coding and pattern systems. These visual signals communicate status information in brand-specific ways. Understanding these differences prevents misinterpretation of your equipment’s status.
Variations in Light Color and Pattern Meaning
Major brands establish their own color conventions for status indicators. Canon typically uses green lights to indicate general operational readiness. Nikon often employs blue illumination for similar ready states.
Sony integrates multiple colors simultaneously for comprehensive status reporting. Their systems communicate battery level, connection quality, and recording state together. This approach provides detailed information through visual cues.
Panasonic implements specific flash patterns for particular status conditions. Their unique sequences indicate error states or special operational modes. These patterns require brand-specific knowledge for proper interpretation.
Brand-Specific Indicator Features
Professional equipment brands implement sophisticated diagnostic systems. Canon and Nikon use coded flash sequences for faster troubleshooting. These patterns can be cross-referenced with the manual for specific diagnostics.
Samsung’s Galaxy cameras feature variable brightness indicators. The intensity changes based on status urgency levels. This subtle variation adds another layer to their visual communication system.
Consumer-grade cameras typically simplify their indicator systems. They use fewer colors and patterns compared to professional models. This approach makes them more accessible to casual users.
Some brands combine light colors or use alternating patterns. These methods convey complex status information through simple visual indicators. Each manufacturer’s implementation reflects their unique design priorities.
Understanding these brand differences requires consulting specific device documentation. Implementations vary significantly between manufacturers. Proper interpretation ensures you respond correctly to your equipment’s status communications.
Other Common Camera Light Colors and Their Meanings
Photography equipment communicates through a colorful visual language beyond the familiar green indicator. Different hues provide specific information about your device’s condition and functions. Learning this spectrum of signals enhances your technical understanding.
Manufacturers use various colors to convey distinct operational states. Each shade represents different conditions requiring specific user responses. This system creates a comprehensive visual communication network.
Understanding Red and Amber Indicator Lights
Red illumination typically indicates standby mode or power-related conditions. Your device shows it’s receiving electricity but remains inactive. This signal often appears during charging or low battery situations.
Amber or orange lights serve as warning indicators for various issues. They alert users to storage problems or connection difficulties. These colors demand immediate attention to prevent operational disruptions.
Some camera models use alternating red-green flashes for specific alerts. This pattern might indicate overheating or other technical concerns. Always consult your manual for brand-specific interpretations.
Decoding Blue and White Status Lights
Blue indicators commonly signal wireless connectivity processes. They appear during Bluetooth pairing or Wi-Fi connection attempts. This color shows active communication between devices.
White lights often indicate special functions or mode activations. Their meaning varies significantly across different camera brands and models. Some manufacturers use them for creative mode indications.
Professional equipment implements sophisticated color combination systems. These visual codes provide detailed status information about multiple parameters. Understanding this full spectrum enables comprehensive equipment mastery.
“The most sophisticated cameras speak through light – learning their language is the first step toward photographic mastery.”
Always reference your device’s documentation for exact color meanings. Implementations vary between manufacturers and product lines. This knowledge ensures proper interpretation of your equipment’s visual communications.
Best Practices for Managing Your Camera’s Privacy
Protecting your visual privacy requires both digital awareness and physical safeguards. Modern technology offers multiple layers of protection against unauthorized access. Implementing these measures ensures complete control over your imaging equipment.

Effective privacy management combines software settings with hardware solutions. This approach addresses both digital vulnerabilities and physical access risks. Users gain comprehensive protection through layered security measures.
Auditing and Controlling App Permissions
Regular permission reviews maintain optimal privacy protection. Navigate to your device’s settings menu monthly to check application access. This routine ensures only trusted programs can activate your camera.
Modern smartphones allow granular control over individual app permissions. You can grant temporary access instead of permanent authorization. This approach minimizes potential privacy risks significantly.
After installing new applications, immediately review their camera access requests. Many apps request unnecessary imaging permissions. Denying these requests enhances your overall security posture.
Singapore’s PDPA regulations emphasize transparent data collection practices. Regular permission audits support compliance with these requirements. They help maintain awareness of which applications access your camera.
Using Physical Camera Covers for Added Security
Physical barriers provide absolute protection against unauthorized visual access. Sliding covers completely block the lens when not in use. This solution works regardless of software vulnerabilities or hacking attempts.
Many security experts recommend covers for always-connected devices. Laptops and smart displays benefit particularly from this added protection. The physical barrier eliminates concerns about remote activation.
Combining software indicators with physical covers creates comprehensive privacy protection. The green dot alerts you to activation attempts. The cover ensures no images capture even if software fails.
For complete peace of mind, consider installing covers on all imaging devices. This practice is especially valuable for security cameras in homes and offices. The physical barrier complements electronic indicators perfectly.
Regular firmware updates enhance your device’s security features. Manufacturers constantly improve privacy protections through software patches. Keeping your equipment updated ensures you benefit from the latest advancements.
These best practices work together to create robust privacy management. They address both digital and physical security concerns effectively. Implementing them gives you complete confidence in your camera’s privacy protections.
Mastering Your Device’s Indicators for Confidence and Control
Your camera’s visual signals provide instant status updates. These indicators translate complex technical data into simple, actionable information. Mastering this visual language builds confidence in your equipment’s operation.
Regular observation helps establish normal behavior patterns. This knowledge enables quick anomaly detection. Users gain better control over privacy and security functions.
Understanding both universal meanings and brand-specific variations enhances technical proficiency. This skill remains valuable across multiple devices and camera types. It supports compliance with privacy regulations requiring transparent operation.
Combining indicator knowledge with best practices creates comprehensive protection. This approach addresses most privacy concerns effectively. Users can use their equipment with greater assurance and control.
FAQ
Does a green light always mean my camera is recording?
No. A green indicator typically means the camera has power and is operational, but not necessarily recording. Many security cameras and webcams use a separate status light or software notification to indicate active recording.
Why is my camera’s green light flashing instead of staying solid?
A flashing green light often indicates network activity, data transmission, or a boot-up sequence. On security cameras like D-Link models, it can mean the device is connecting to your network. A solid light typically confirms a stable connection.
How do I know which app is using my smartphone camera when the green dot appears?
On iOS, swipe down from the top-right corner to see the active app in Control Center. On Android 12+, check the Quick Settings panel—it shows which application currently accesses your camera or microphone when the green indicator appears.
Should I be concerned if my camera’s green light stays on when I’m not using it?
Yes. A persistent green light without active use could indicate unauthorized access. Immediately check your app permissions, run security software, and consider disabling camera access until you identify the source.
Can I disable the green indicator light on my camera?
Most consumer cameras don’t allow disabling hardware indicator lights due to privacy regulations. Some professional security cameras offer software options to disable LEDs, but this varies by manufacturer and model.
What does it mean if my camera has no green light when it should?
A missing green light could indicate power issues, hardware failure, or disabled indicators. Check power connections, restart the device, and consult your user manual for troubleshooting specific to your camera model.
Do all camera brands use green lights for the same purposes?
No. While green often indicates operational status, meanings vary. Arlo cameras might use green for good battery, while D-Link uses it for network connection. Always consult your device’s manual for brand-specific indicator meanings.
What other light colors should I look for on my cameras?
Amber or yellow lights often indicate setup mode or weak connection. Red typically signals recording, low battery, or errors. Blue lights frequently denote Bluetooth pairing mode on wireless devices.


